Learn how you can design a very attractive shiny button in Adobe Photoshop, advance skills are not required to begin with. At the end of this tutorials you will able to learn who you can design shiny web elements for you next project.
Lets take a look what we gonna make today.
Preview:

Step 1:
Our first step is to create New document. Go to File > New (Ctrl+N) and create a new document of (500px x 500px) size as you can see in the following image.

Step 2:
Its time to make 4 Guides with the help of View > New Guide, positions of these guides are given bellow. Please take a look at the following image for better understanding and we are creating these guides for accurate results.
- Vertical; Position: 170px
- Vertical; Position: 340px
- Horizontal; Position: 230px
- Horizontal; Position: 240px

Step 3:
Now Select Rounded Rectangle Tool (U) and also made some changes in Option Panel. Select the Shape Layer > Rounded Rectangle Tool > Radius: 5px > Create a new Shape Layer button > Style: None > Color: #2d2d2d.

Step 4:
Now create a (160px x 40px) rounded rectangle. As I did.

Step 5:
Now we use blending options to make this rounded rectangle a glossy button. Down in the layer box you can see a button [fx] click on it and select Gradient Overlay option;
Gradient Overlay Option Setting:
- Gradient Colors : #0597fd and #011cbc
- Scale: 150%
Now Select Inner Shadow Option and the Setting is below:
- Opacity: 25%
- Distance: 0px
- Size: 10px
and simply OK.

Step 6:
Hold Ctrl key on the keyboard and click on rounded rectangle and you will see it will be selected on the artboard.

Step 7:
Now go to Select > Modify > Contract and Contract Selection option box appear on the screen set the value 1px and OK.

Step 8:
Create a new layer (Shift+Ctrl+Alt+N).

Step 9:
Select Fill Tool (G) to fill the layer 1 with white color #ffffff and set the Fill 0% in the layer Box. After setting Fill 0% lets put some blending options.
Stroke options:
- Size: 1px
- Position: Inside
- Color: #ffffff

Step 10:
Keep selecting Layer 1 and now insert this layer in Group (Ctrl+G), see (Tag. 19). After grouping Add Layer mask, and select Gradient Tool (G) and black and white gradient (Tag. 21). Now put this gradient from down to upward on the Group Layer Mask and set Opacity: 50%, (Tag. 22).

Step 11:
Create 1 more layer (Layer 2) inside the group 1. Click on Rectangle Marquee Tool and select half of the button area as you can see in (Tag. 24). Now select again Gradient Tool and select white and transparent gradient (see tag. 25) and put this gradient on layer 2 (see tag. 26). It creates shining effect.

Step 12:
Now hold Ctrl and click on Layer 2 (see tag. 27) and keep selecting, press Ctrl+Alt and click over the Layer 1 (as you can see in the tag 28). You will notice the blue box selection is subtracted from white selection area, now just select layer 1 again from Layer box and press Delete.

Step 13:
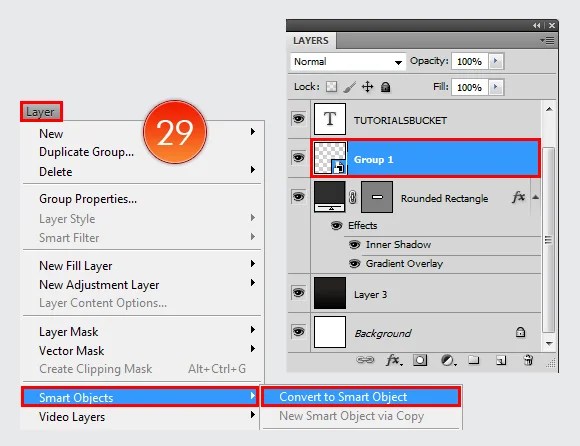
Your last and final step is to make this group Smart Object. Go to Layer > Smart Objects > Convert to smart object. Now you can put any text on this button and use it anywhere you want.

Final:
Now you can see the final results same as mine.

Leave a Reply